|
Hiking and Backpacking Gear and Tips I've gotten several e-mails about what gear is necessary for hiking and backpacking. There are 100s of vendors out there selling different qualities of gear at different prices. To try to evaluate them all here is impossible and beyond the scope of this website. Instead I've chosen to list the most important items you'll need and what features to look for and avoid. I strongly recommend visiting one of the many on-line outfitters and doing some comparison shopping. REI has one of the most extensive sites and can help you compare specifications and prices over a broad range of manufacturers. Once you've selected your gear you can go elsewhere on-line or at a brick and mortar store to get the best price. For things such as backpacks and boots visit a store and try them on first or purchase only from a vendor with a liberal return policy. First we'll discuss basic hiking gear. OK, Now .... ARE YOU READY TO GET GEARED UP???? |
|
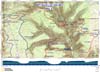
Prepare: Do your research. Collect the necessary maps (Topos are the best!) and trail guides then plot your route. Sometimes having more then one reference is preferred. Trails are constantly in a state of flux. Even info found on sites like this one can quickly become outdated. If you are just getting started begin short and easy. Increase the length and difficulty of the trip as you gain experience. Let others know your plans and when you should be home. When possible, leave emergency contact numbers for the local Rangers and police.
Footwear: This is the most important equipment you'll need to purchase. If you buy the wrong kind, quality or size the hiking experience may be painful. Footwear can range from light weight trail shoes to more robust backpacking boots. For long treks over rocky terrain and weekend backpacking I recommend mid-weight, high top, waterproof boots from a reputable manufacturer. Personally, I won't buy boots on-line or from a dealer that doesn't have an incline for testing proper fit. When going up the incline your heel should not slide up and down on the back of the boot. When descending your toes should not jam into the front of the "toe box" of the boot. Many folks tend to overlook socks as an important part of their footwear. Many "street" socks tend to slip when hiking. This is a sure way to develop blisters. I recommend light weight wool or smart-wool socks designed specifically for hiking. If blistering persists add polypropylene (or other synthetic) wicking liners under your socks. These remove perspiration from your feet. For extreme stream crossings, "waterwhacking" and relaxing by the campfire at night consider a pair of sandals. Clothing: For all seasons your undergarments should be made of a wicking fabric such as polypropylene or polyamide. These materials carry moisture away from your body and dry quickly. Warm weather outerwear should also possess wicking properties. In colder temps the outermost layer should work as a shell to help keep body heat in. Cotton and cotton blend clothing, even more specifically denim, are hot, heavy and remain wet for long periods once they get wet. Nylon and polypropylene shirts and trousers are better alternatives. Trousers with "zip-off" legs come in handy when you might experience temperature extremes through the course of an outing or run into a bushwhacking situation, stinging nettles or poison Ivy/Oak/Sumac. Don't forget your head and hands. I forget the exact number but the greatest percentage of body heat is lost through the extremities. This includes your feet, hands and head. In the summer or when you're overheated you need to vent this heat. In the winter or when you're cold you want to trap it. Also in the summer you should wear a hat to keep the sun off of your head. Wear a hat that will shade you but also allow the heat to vent. Synthetic fleece, wool and combinations of both make very nice outerwear for the cold months. Day packs: These come in all shapes, sizes and prices. While the majority of folks prefer the usual backpack style an increasing number of people are using Lumbar (AKA Fanny) packs. Both work well but I have to admit the the Lumbar packs seem to put a lot of pressure on my hips when climbing steep grades. The important things to consider is comfort and the volume needed to carry all of your stuff. Rain Gear: For the occasional hiker a disposable poncho might be OK. These however trap your body heat and might, at times, block your view of obstacles in the trail. Purchase a light weight, breathable rain suit. First Aid: The size of your kit will vary depending on the length and difficulty of your outings. At the minimum it should consist of band-aids, sterile wipes, gauze, antiseptic ointment, mole skin (for blisters) and perhaps an ace bandage. Longer treks, backpacking trips, etc. require a larger, more complex kit. You can build your own or purchase them at a health care store or outfitter. Whatever you do, inspect it several times a year and replace any components that have deteriorated. Compass: This is the smallest , yet the most valuable piece of hiking equipment you should have. If you don't have any idea what direction you're walking in the best topo map on the planet becomes useless. You need not buy an expensive one nor is it necessary to be an expert in its use. At the minimum be able to use it to orient your map to true north. Water and food: Needless to say, your body will need calories and hydration as you hike. Bring high energy foods (complex carbs are the best!) and plenty of water. Some folks use a linear correlation to estimate how much water you need. I feel that as the body fatigues it needs even more water. For the first 5 miles bring at least one liter. For 8 miles bring 2 liters. for 10 miles or more bring 3 liters. Try to keep yourself hydrated. Once you become dehydrated it takes hours to return to normal regardless how much water you drink after the fact. And remember, you can dehydrate in the winter as well as in the summer!!! Also, some folks experience electrolyte loss. I strongly recommend athletic drinks such as Gator-aide or Squencher. Loss of electrolytes increases the severity of cramping. Trekking Poles: I've heard a lot of pros and cons about these items. All I can say about them is that ever since I started using them last Christmas I've found going up and down hills a lot easier. They also help you maintain your balance when rock hopping streams. I'll admit to finding them a nuisance when traversing boulder fields. All they do is get hung up in the crevices and there is nothing there for the tips to dig into but solid rock. My personal preference are those constructed of graphite. They are the lightest ones out there! If you find you are getting by without them don't worry about it. Cell Phone: Most of the time these little conveniences are worthless in the woods since there are no signals. Still, there are times of emergency when, if you can get to high ground or an open area you might get a signal. Carry it with you but keep the power off until you need it. Everybody has their favorite so I'll leave it at that. |
|
| Backpacking is an extension of the past time of hiking. A friend once told me it's pretty much the same except you're required to carry everything you need to exist for the allotted time ... on your back!!! My backpacking experience, to date, has been limited to 2 or 3 day, 3 season outings. After that point my body starts to yearn for a hot shower and a comfy bed. Such being the case, the following information is directed to the weekend warrior. |
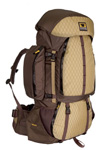
| Backpacks: For a 2 or 3 day excursion I find a pack with a 4500 cubic inch capacity adequate. If you purchase a smaller one you'll find yourself tying more of your gear on the outside. Get something larger and you'll easily find a way to fill the void, adding more weight to your rig. Try to balance volume and weight. The Mountainsmith Gryphon shown here carries up to 4600 cui but weighs less than 5 pounds. I believe Gregory makes a similar pack. Both have adequate strap/support systems for a 3 day outing. If you plan on being out longer you need something a little better. Items to look for in a backpack: 4500 cui volume; weight less than 5 lbs (hard to find), separate sleeping bag compartment, lid convertible to fanny pack, web pockets for bottles, hydration bladder compatible, good strap/support system. Make sure you purchase a duck bag or rain fly for your pack. They are not waterproof. Size/Fitting: Backpacks come in different sizes and these may not be uniform between manufactures. Especially if you are a novice it is best to go to a reputable outfitter and get fitted for a pack (even if you plan on buying the same pack on-line). There is nothing worse than a pack that is too large or too small to the point that it can't be adjusted. When fitting your pack it's important to remember that most of the load should be carried on top of your hips (not around or below). The pack should be flush against your back. There should be a slight triangle of space between the pack and your shoulders. Do not draw the load tight against them. There should be no space between the top of the shoulder straps and your shoulders. There should be little, if any, load on them. When climbing prolonged steep hills you may want to temporarily take some of the load off of your hips and placing it on your shoulders by adjusting the load shifting straps.
Hydration System: I prefer
a bladder which can be stored inside the pack. They come in two
and three liter sizes. I use the smaller one for day hikes and
backpack trips when I know I'll be passing several water sources
through the course of a day. I use the 3 liter one for very long
day hikes or when water is at a premium on backpack trips. Avoid
putting athletic beverages in the bladders as this leads to
cleaning issues. Others hikers like bottles. I still carry wide
mouth bottles on Backpacks for collecting water for cooking and
cleaning. The wide mouth fits the bottle adaptor that comes with
my filter.
Rinse out with
water containing a couple of drops of household bleach/liter and
air dry. Tent: A tent is to camping as boots are to hiking. It is the most important item in your kit. After a long day of backpacking in the elements no one wants to crawl inside of a wet tent. This should be your biggest investment. Ultra-light tents are the way to go but keep a few things in mind: Both tents and sleeping bags have an odd rating system. In most cases, if an ultra-light tent is called a 2 person tent it is probably a 1.5 person tent unless you believe in the Steven Stills song "Love the One You're With". Single walled tents seem to have a much bigger condensation issue than tents with separate rain flies. Finally, look for a stand alone tent. You can find lighter tents that require you to tie out certain components to set them up but moving them or setting them up in areas where the ground is not suitable creates problems. Also, cleaning out a stand alone tent is easier. Simply pull up the ground stakes, unzip a door, pick up the tent and shake it out! Other features to look for: condensation vent, vestibule and door for each occupant, light weight. The REI quarter Dome shown here weighs less than 4 pounds. Finally, many backpackers forgo purchasing a footprint to save on weight. I think the few extra ounces will significantly increase the lifetime of the tent.
Sleeping Bag:
Bags come
with either synthetic or down filling. I prefer the latter
because they are lighter and compress a lot more, taking up less
room in the pack. There are 2 disadvantages to a down bag: 1) if it
gets wet it loses its insulating properties, 2) they require
special cleaning. As with tent sizing, the temperature rating
for sleeping bags are way over rated. For 3 season camping a 20
degree bag should be adequate. They usually weigh around 2
pounds. In the peak of summer a 45 degree bag will do just fine.
I have both. They come in regular and long lengths as well as
left and right zippered. Some brands make bags especially cut to
fit a woman's torso. Do not keep a sleeping bag, especially a
down one, compressed when not in use. Store lose it in a large,
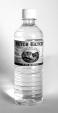
breathable bag. Mattress: Some folks get by with soft foam mats. Some are flat. Others have an egg crate design. A very popular sleeping pad is the Z-Lite fold up mattresses by Therm-a-Rest. I've heard several complaints about these. First, folks tell me they seem to slide off of them more. Second, I've been told that they don't insulate near as well as even the thinnest inflatable mattress. I prefer Therm-a-Rest inflatables. They are far and away the leaders in this technology. The Prolite 3s and 4s are the lightest made and have the highest R-rating. The -3s come in 2 lengths, short and regular. The -4s come in short, regular and long. A size is made specifically for women in both models. Water Purification: Never, ever drink from an untreated water source!!! When possible draw water from a moving body of water. Water should be either brought to a rolling boil for a minimum of 10 minutes, treated with iodine and/or filtered. When purchasing a pump/filter water purification system make sure it is rated to filter Giardia (the main microbe of interest) and other common pathogens. All filters require maintenance, some more than others. Being lazy, I like the Katadyn products. The Hiker model comes with a disposable filter. After each trip, simply pump one liter of tap water with a couple of drops of household bleach through the filter, disassemble the filter (unscrew the cartridge) and allow to air dry. It's supposed to be good for several 100 gallons but I replace the cartridge every year. The down side to this particular filter is that the cartridge costs $35.00 (The cost of being lazy, I guess.) Another consideration is that some streams, creeks and rivers might be severely acidic due to past mining operations and/or acid rain. The amount of chemical pollution probably isn't enough to harm a person when used short term but it doesn't taste good (sort of a lemony flavor). If you know or suspect that your water source is polluted in this manner look for a feeder stream that flows into it and use that. Finally, some water sources are stained yellow or red. This is not necessarily a sign of pollution but rather due to the presence of tannin from the decomposition of evergreen needles and peat moss. These are actually natural water filters. Cookware, Utensils, etc: I call this " The Kitchen". Some folks are real minimalists when it comes to this and seem to be able to live off of Powerbars for 3 days. When backpacking you expend a lot more energy than when simply day hiking. A small light weight kitchen allows you to prepare warm, nutritious meals. Materials of construction include stainless steel ( the heaviest), aluminum (2nd lightest) and titanium (by far the lightest). Each have their pros and cons. I use titanium because it is light and holds the heat well. It is pricey and tends to develop hot spots so heat control is important. When most meals are centered around boiling water it's definitely the way to go. Note: Avoid tall, narrow pots unless you are simply boiling water. Unless you are constantly stirring, they have uneven heating characteristics. The food on the bottom could be burning while the food on top isn't even hot. There is nothing as unappealing as having to eat burnt food on the trail. I know from experience. Flatware is made with the same materials. Some folks use light weight heat resistant (note the word resistant ... not proof.) plastic utensils. They do OK in boiling water but I've seen them melt in a frying pan. Others use disposable picnic-ware. These are light weight but may not hold up to heat. Also, if you break it you might not have a spare! Mugs also come in a wide assortment of materials. There is even one out there that is light and collapsible made of a polymer. If you are into coffee, tea and or hot cacao this is a must pack item. Make sure you include biodegradable soap, waterless hand cleaner, cigarette lighter and/or water proof matches (for the stove), P-38 can opener, fire starter sticks (for the campfire) and scrubbing pad in your kit. Stove: There are all kinds of stoves out there. Until recently the most popular has been those that use white gas as a fuel. They work well and are pretty reliable. They require priming before use. If you prime too much you will have to handle a conflagration until the excess fuel burns off. Personally, I'm kind of leery about putting a flammable liquid in my backpack. Should the fuel canister leak you can have a real mess that would be near impossible to clean up on the trail. If this is your choice carry the canister on the outside of your rig. You can also buy/make alcohol stoves. These are light weight, inexpensive and simple in design. The flammable liquid issue is still there however. They are good for short periods of boiling. There are also little stoves that can boil water with a collection of little twigs as a fuel source. They have a battery powered fan that directs the heat toward the pot. It's pretty surprising how much heat they can generate. They tend to be sooty. A few years ago butane/propane stoves hit the market. They resolved the flammable liquid issue and greatly reduced the size, complexity and weight of a cooking system while maintaining high BTU output. Shown here is the Pocket Rocket made by MSR (my choice). There are 2 negatives with gas stoves: 1) BTU production drops off greatly when the temperature falls below 45 degrees. This is due to the fact that the gas mix wants to remain a liquid while under pressure at these temps. It is suggested that you keep your fuel canister in your sleeping bag with you to keep it warm. Since I'm a 3-season backpacker this usually isn't an issue for me. Also, there is now supposed to be a gas blend that performs better at lower temperatures. I haven't tested it yet. The other issue is that there is no obvious way to tell how much fuel is left and once empty the canister cannot be refilled. The best way to do this is to weigh an empty canister and a full one on a kitchen digital scale. The difference in weight is the amount of fuel in a canister. Re-weigh it after a trip. This will tell you how many trips you can get out of one canister. Mark the canister with a sharpie to keep track of the number of trips you've carried it on. As it gets close to becoming empty carry an extra fresh canister on the next trip. SAFETY NOTE: Before cooking make sure the area is free of all flammable debris. It's best to do your cooking on top of a nice flat rock whenever possible. Lighting: Pack a small, light weight but powerful flashlight or headlamp for the evenings at campsite or for those times you might still be out on the trail at night. Keep the batteries fresh and consider carrying spares. Scoop or Shovel: Needless to say, nature is our bathroom while we are backpacking. Use a scoop or small shovel to dig a small cat hole. Bury the fecal matter and TP. Mother Nature and the bacteria containing earth will take care of the rest. Please do this far away from the trail and any water source.
Knife: I don't use it a lot but when we need it I'm glad I have it. It doesn't have to be anything fancy. A simple pen knife will do. Use it to cut cord, make repairs, prepare food or trim a marshmallow roasting stick.
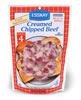
Food: OK ... this is an inexhaustible topic. Such being the case I'll just throw some ideas out there and let your creative juices flow. If you are a minimalist you will live off of energy bays and granola. (That's OK but don't drool over my food please!). Then there is the easy, light way .... dehydrated meals (just like the astronauts eat!!!). Companies like Mountain House et al do a reasonable job of making entrees, side dishes, deserts and combo meals for the backpacker. Just add boiling water and wait 10 minutes. Since we are just weekend backpacking here it's OK to bring some fresh things to be consumed on the first day. (Fresh fruits and vegetables last longer but they really get heavy in the pack after a couple of miles!) I know folks who have brought frozen steaks and burgers for the first night's feast. (By the time you hit camp it might be totally thawed out.) The best source of energy are carbohydrates. I used to bring Raman noodles all of the time. They are cheap, light and cook really fast. Unfortunately they are composed of very simple carbohydrates which your body breaks down at a rapid rate. If you find yourself lacking in energy use whole wheat pastas (They take longer to cook.) and whole wheat or multi-grain bread products for your carb sources. Pack them in single serving size zip-lock bags (How did backpackers survive without these?) Something new .... and a compromise for the weight/flavor issue. Inadvertently the general food industry has created some products meant for those who are constantly on the go (or too lazy to cook a real meal) that are ideal for the backpacker's pantry. These are pre-cooked foods in microwaveable boiling pouches or aluminum foil envelopes. Both StarKist and Chicken of the Sea make single portion tuna (some seasoned), salmon, crab and shrimp in aluminum foil packages. Sweet Sue makes chicken in a similar pouch. (I've been told that ham and turkey is also available but I haven't found it yet.) Esskay makes Creamed Chip Beef (my favorite), Sausage Gravy, Beef Chili and Barbequed Pulled Pork in microwaveable boiling pouches. These are found in the refrigerated section of your grocer but can be stored for months at room temperature. Uncle Ben's makes an entire line of boiling pouch rice dishes. Cooking time for these pouches on a Pocket Rocket at medium/high heat is about 15 minutes. The recommended 10 minutes isn't quite enough. For Dessert there are single serving fruit cups, Jello (w/ and w/o fruit) and pudding (PUDDING????), none of which require refrigeration. Then there are dried fruits and vegetables. I particularly like the apricots and mangos. Speaking of dried foods, some of my backpacking friends have really gotten into dehydrating fresh or fresh cooked foods for the trail. I've been told that a good dehydrator might be expensive and the process is time consuming but to these folks it's a part of the hobby. I almost forgot!!! Coffee! I'm an admitted caffeine addict. I can't go anywhere without my java! Some folks use instant (yuk, but it works!). Others use the Maxwell House or Folgers single serve packets or tea bags. Being a coffee snob none of these will work for me. I fresh grind my beans the night before and seal them in a zip-lock bag. I boil my water and put a couple of tablespoons ob my "nectar of the gods" into these neat throw away empty tea bags I found (located where you would find coffee filters in your grocer.), pour the water into my mug and let the tea bag steep for a bit and presto! You have the perfect cup of coffee. Finally, there are literally hundreds of folks out there who fancy themselves Trail Gourmets. Try Googling "Trail Recipes" or Backpacking Recipes" and see how many hits you get. Other Tips: Besides everything discussed above,
Free Power Point Presentation for Non-profit Use
|
|
|
|